


The Turkish get-up is one of the most functional exercises you can do. The move takes you from lying on the floor to standing upright, all while holding a kettlebell above your head. The full-body exercise is great for improving coordination and shoulder stability so that you can lift heavy things and avoid injuring the vulnerable shoulder joint. It also trains the simple (but necessary) skill of getting off the floor, says certified personal trainer Sarah Polacco, fitness director of Achieve Fitness in Boston and StrongFirst Team Leader.
“The Turkish get-up is one of my favorite movements!” Polacco says. “Because you are moving from the floor to standing, and moving through a series of multiple steps, it forces you to think more about each move and to create overhead stability from multiple angles and positions. [Because of this], it is really great for shoulder health and can be really beneficial for someone rehabbing a shoulder injury (as long as there is currently no pain with the movement),” she adds.
While Polacco says that the move brings a wide variety of benefits—like learning to slow down and think through movements more intentionally, and building overhead strength and stability—she also notes that proper execution requires a few foundational skills. “Being able to bring your arm straight overhead without an elbow bend and without your back arching as well as being able to do a lunge are both skills needed in order to perform a full Turkish get-up,” she says.
Before picking up a kettlebell, you should work on mastering the Turkish get-up with just your body weight.
“It is important to be able to understand each step first before bringing weight into the mix,” says Polacco. “In StrongFirst we say ‘Your setup is your first rep,’ so we want to take our time and make sure we don’t rush through it. The better the setup, the better the overall movement will be. Once you feel comfortable with the movements, you can add weight to them.”
Here, Polacco gives the step-by-step instructions for setting up the movement:
- Lie on your back in a starfish position with your legs straight out at a 45-degree angle and arms out at a 45-degree angle.
- Bend your right leg and place your right foot flat on the floor a few inches from your butt and outside your hip. Bring your right arm straight up toward the ceiling, making a fist with your right hand and keeping your knuckles pointing straight toward the ceiling. Don’t let your wrist bend backward. Set your gaze on your fist, which is where the kettlebell will eventually be.
- Next, push through your right heel and your left elbow to prop yourself up onto your left elbow. In this position, your left shoulder should be packed. To pack your shoulder, start by slouching your shoulder rounding it forward, and then reverse the motion by pushing your arm through the floor so that your shoulder is packed down and away from your ears. Your chest should be facing the wall in front of you, not facing the ceiling.
- From here, place your left palm on the floor, pushing into the floor and using your abs to pull your body into a seated position. Keep that left shoulder packed the entire time. Think about screwing your palm into the floor so your elbow pit turns out away from you, and your fingertips are turned slightly back behind you.
- Next slide your left leg underneath you and toward your butt, placing your left knee and left ankle in a straight line with your left hand. Your left knee should be stacked directly underneath your left hip and the distance between your knee and your hand should be about the same length as your torso. If you need to adjust, adjust your knee and not your hand.
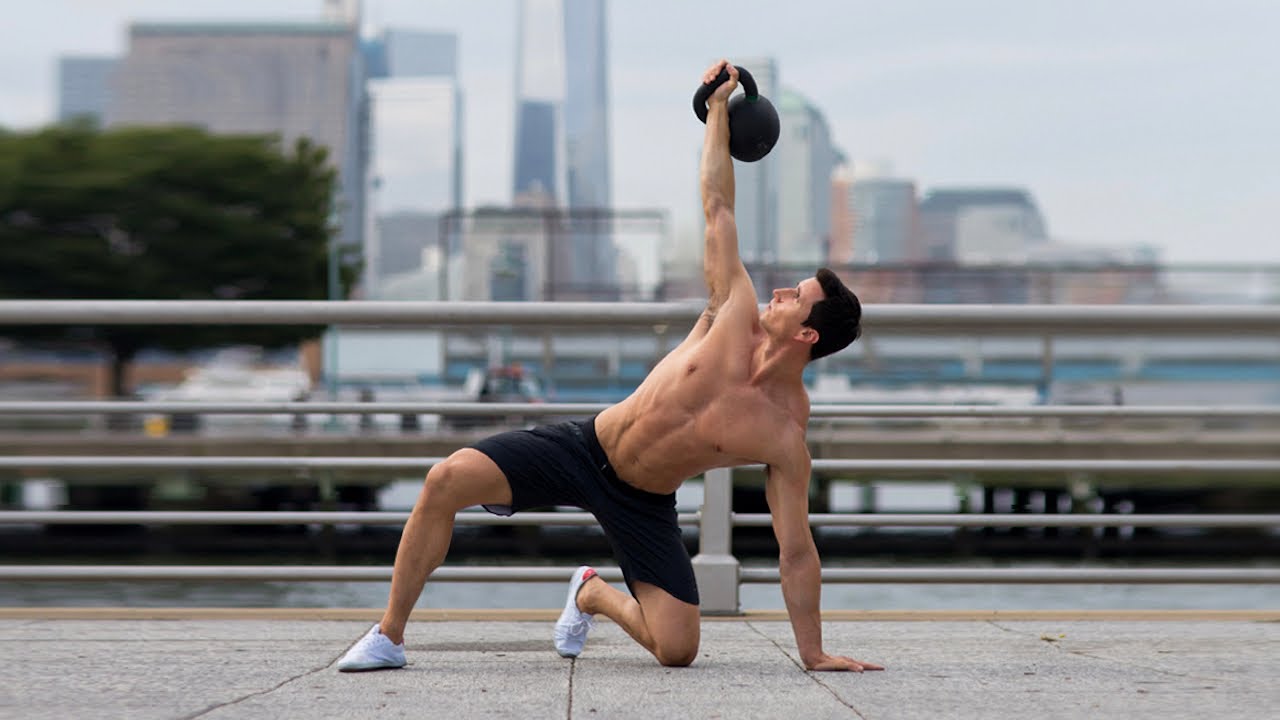
- From here, shift your weight back toward your left heel. Come to an open half-kneeling position (in this position, your “up” knee should be at a 90-degree angle and pointing directly in front of you and your “down” knee should also be at a 90-degree angle but this knee is pointing to your left). Now, shift your legs into a half-kneeling (or a lunge) position by sweeping your left leg (down knee) behind you to the left, so that this knee is now pointing directly in front of you. You should now be looking straight ahead.
- From here, think of getting nice and strong, engaging your core, and pushing your back foot into the floor to bring your feet together to a standing position. Congrats! You’re halfway there.
- To get back down, you are now going to perform all the steps in reverse. Going down is just as important as going up, so be sure not to rush this part or let yourself relax. You should still be holding the kettlebell with a straight arm over your head. Start by taking a big step back with your left leg into a reverse lunge. Then, reverse the sweeping motion of the left leg (down knee) to return to the open half-kneeling position.
- Once in the open half-kneeling position, sit your hips back toward your heel while reaching your left hand down and placing it on the floor in front of your left knee. The distance between your hand and your knee again should be about the length of your torso. At this point, switch your gaze back up to the fist or kettlebell until you finish the movement.
- Shift your weight back into your left hand. Sweep your left leg out from under you and sit down with your leg extended. You should end up in the same position here as when you were rolling up onto your hand. Your palm should be screwed into the floor, elbow pit rotated away from you, and shoulder packed and away from your ears.
- From here, push your palm into the floor and let your elbow bend in toward you. Make sure as you touch down to your elbow you keep that shoulder packed. Slowly push your left arm into the floor and allow yourself to gently come back to the floor.
Once you feel comfortable with the movements, try adding a kettlebell.
You just have to alter the first two steps:
- From the starfish position, roll onto your right side and grab the handle of a kettlebell with your palm facing the ceiling. Place your left hand on the bell.
- Roll onto your back and punch the kettlebell straight up to the ceiling using both hands. Once the bell is steady, place your left arm and left leg out at a 45-degree angle. Remember: Don’t let your wrist bend backward, and set your gaze on the weight. Bend your right leg and place your right foot flat on the floor a few inches from your butt and outside your hip.
- Now, continue with the rest of the movement as explained in the instructions above.
After you return to the floor, keep your right arm still straight up to the ceiling and bring your left hand up and place it on top of the handle. With both hands, lower the kettlebell to the floor, bringing your right elbow to your side. Once your right elbow meets the floor, you can roll to your right side and let go of the weight.
Here’s how to fit the Turkish get-up into your strength routine.
For beginners and anyone who is advanced but working on increasing the weight they lift, Polacco suggests doing the Turkish get-up right after warming up but before your strength workout. “This way the body is warm, but it is not overly taxed from the rest of the workout. Your brain is also still fresh and able to think more about each move.” If you’re advanced and comfortable with the weight you’re using, she suggests using it at any point during your strength training session or even incorporating it into your warmup—it is a very dynamic movement, after all.
Either way, Polacco says that doing two or three sets of one or two reps on each side, one to three times per week, is generally a good guideline to reap the many benefits of the Turkish get-up.


