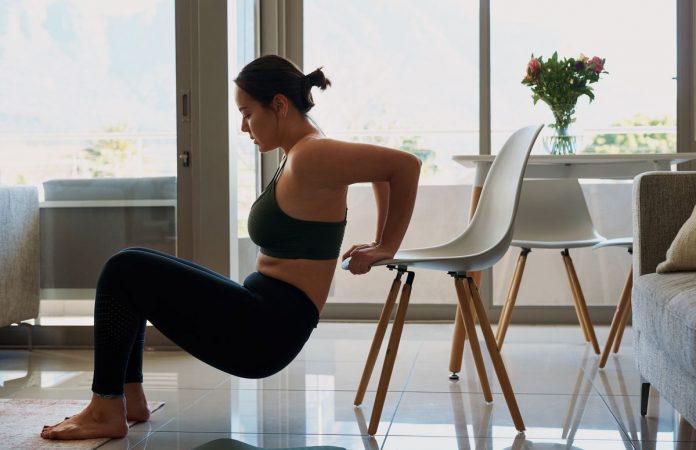
Chair dip exercise is part of the home fitness program, fitness you can do at home with minimal equipment. Chair dips are a great alternative to regular dips if you want to increase arm, core and lower back strength, among others.
Benefits of Chair Dips:
Triceps: If regular dips are out of reach for your physical abilities, only pressing a part of your own weight can be a great way to build up strength in your triceps, and also strengthen your joints. Chair dips are also effective for triceps muscle recovery following injury or illness.
Pectoral Muscles: This exercise is designed specifically to target the triceps, but it also stretches the pectoral muscles. It encourages the chest to build strength in a balanced way than other weightlifting exercises. It is convenient to do these dips at home or at work, and you will notice effects within a month if you incorporate this exercise into your daily routine.
Core and Lower Back: While this isn’t the focus of the exercise, there is some amount of balance and stability required to execute these dips accurately and safely. It helps to improve your lower back and core muscles, even if you don’t realize you are exerting them.
Equipment for Chair Dips:
You will need a strong and stable chair for this exercise and a large enough space that is free of sharp or dangerous objects. You can place the back of the chair against a wall to ensure that it doesn’t slide backward while you are performing the exercise.
How to do Chair Dips?
- Sit on the edge of a chair, facing forward.
- Put your hand on the edge of the seat, shoulder width apart and in line with your hips.
- Ensure you have a firm grip and lift your lower body off the chair.
- Keeping your head and chest lifted, walk your feet forward until the heels are an inch or two in front of your knees. Make sure your knees don’t bend further than your toes.
- Lower your body down, keeping a minimum angle of 90 degrees at the elbows. To make sure the joints remain safe, keep the elbows tucked into the body and try not to let them flare out.
- Lift the hips and heart upward, straightening the arms and supporting your body weight.
- Repeat this lifting and lowering motion as many times as feels appropriate to your body.
Key Points to Remember:
- Keep your head up, looking straight ahead, throughout the exercise
- Don’t bounce at the bottom of the movement.
Alternatives:
- You can make this exercise more challenging by supporting yourself on one leg at a time.
- The intensity of this exercise can be adjusted by using steps or chairs of different heights


